Overview
Making your own action figure heads is fairly
easy. Youll need the proper ingredients, of course, but most of
all youll need patience. Dont get frustrated if your first couple
of attempts dont work out. Keep practicing, learn from your mistakes.
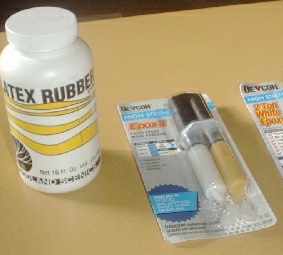
Materials
Original action figure head
2 X 2 squares of cardboard
White glue
Talcum powder
Liquid latex rubber
Two-part epoxy resin
Most of the items can be found fairly easily.
The difficult ones are the liquid latex rubber and the two-part epoxy resin.
The brand of liquid latex rubber that I use and have been quite satisfied with is Woodland Scenics Latex Rubber (Part # C1204). The only place Ive seen it for sale is at a local hobby shop. Its on the shelf with various landscaping supplies intended for model railroad landscaping. It runs nearly $10 for a 16 oz. jar, and with the very small amount I use for making action figure head molds it lasts for a long time. Be sure to seal it tightly when not in use as it can dry out if not sealed properly.
The brand of two-part epoxy resin I like is Devcon. In particular, I like to use Epox-it Paste Epoxy Wood Adhesive (Part # S-75) as it can be finely sanded when its dry and it holds most paints pretty well. I generally always get the cream colored resin as the lighter colors are better for painting. The only drawback is that it takes a long time to dry completely (up to a week). This product is usually marketed as a wood glue, so it can be found in the glue section of most hardware stores, although Ive spotted it in the sections for sealants in some stores. Cost is about $3 a package. One package is good for making about six Playmates 4.5 Star Trek action figure heads.
Process
Head Removal from the Action Figure Body
This procedure has been documented elsewhere
Just be sure that the recently removed head has cooled to room temperature
before proceeding.
Securing the Head
Place a small dab of white glue in the center
of the 2 X 2 piece of cardboard. Glue the head stem to the cardboard
in an upright position. The cardboard will allow you to keep the
head secure and hands free while applying the latex. It will also
provide a base for the flange of latex that will be needed during the mold
making process. The use of white glue is because it isnt very permanent
and can be easily removed later.
Initial Layers of Latex Rubber
Once the white glue has completely dried, youre
ready to start adding the latex rubber and start making your mold.
Youll lay down several coats of rubber throughout the entire process,
but these first couple of coats are very important to get right.
Pour a light dusting of talcum powder over the
head and the cardboard. Blow off any excess as all you want is a
very thin layer. This will help in getting the latex mold off the
head when youre done.
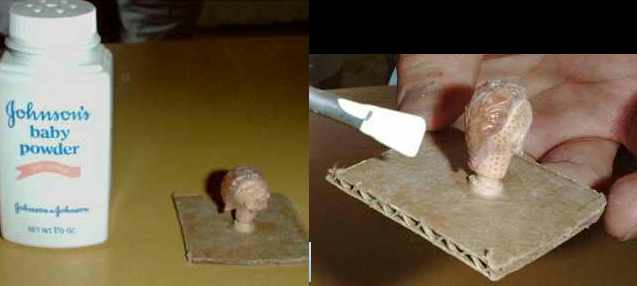
This picture shows the head just before applying
the first layer of latex rubber.
Now brush on a very, very thin layer of latex
rubber. Take extra care that there are no latex bubbles in the tiny
crevices. Any bubbles could stay there and become a part of your
mold, and you certainly dont want that. Also, brush the rubber onto
the cardboard from the heads stem to at least half an inch out.
Let this thin layer dry. It should take only a few minutes or so.
It should be non-sticky to the touch. Repeat this step two to three
times until the dried layers of latex is clearly visible.
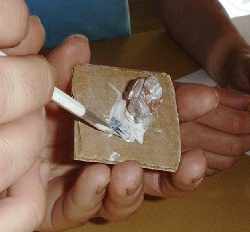
Here it is with its first coat of latex.
Note the flange on the cardboard. Egads! Those fingernails
are dirty!
Subsequent Layers of Latex Rubber
Continue brushing on layers of latex, letting
it completely dry between coats. For these subsequent coats, its
not as important to avoid bubbles in the latex, so lay it on thicker.
Be sure to keep brushing the latex onto the cardboard as well to create
a latex flange from the action figure head. Keep repeating
until the layers of latex are about two millimeters thick.
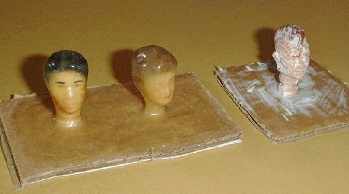
Here's some comparison shots. One has a
fresh, thin layer of latex. The others have several coats of latex
and are ready to be removed in the next step.
Removing the Original Head from the New Latex
Mold
Now its time to free that head from the mold.
Be absolutely sure everything is dry before proceeding with this step!
If things arent totally dry, you can end up distorting your mold.
First, peel up the flange of latex from the cardboard
and completely remove the head and latex from it.
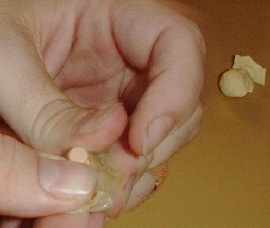
Kinda hard to see here, but the stem of the head
is poking out of the mold...
Work slowly and pull back the latex mold from the head. It might be slightly stuck in places, but thats okay as it should come loose fairly easily. Youre going to roll back the rubber almost like removing a latex glove from your hand. Dont worry about distorting the rubber as it will naturally bounce back to the shape of the mold. The mold may even turn completely inside out. Just use a thin, blunt object to push it back into shape. (I use the end of a paintbrush).
Mixing and Pouring Resin into the Mold
Heres the messy part where we pour the resin
into the new mold. Throughout this process, try your best to avoid
getting the resins on your hands. Its sticky and difficult to clean.
And be all means, dont work in an area where you cant afford a big ol
glob of goo to onto unwanted surfaces!
If possible, put a tiny bit of talcum powder inside the mold. This might be easier to do when (and if) the mold is inside out. Either way, be sure you have as little talcum inside as possible before proceeding. You just want a very thin coating as a release agent for the epoxy resin.
On a disposable surface, pour out a bit of the two part epoxy resin mixture. As for a surface, be sure to use something that will not contaminate the resin mixture. Avoid newspapers. I usually use the slick advertisements that turn up in the Sunday edition of my local paper.
Thoroughly mix the chemical. Very thoroughly. Just when you think youve mixed it enough, mix it a little more. To do this, use any disposable toolagain one that wont contaminate the mixture. Also keep in mind that you might be using this tool to scoop up the mixture and pour it into the mold, so use something appropriate. I actually use toothpicks. Its a little awkward to scoop up the material, but its thick enough to stick to the toothpick in sufficient quantities.
Once you have the resin well mixed, scoop a few small bits of it into the mold. You might have to shove some down inside as the mixture is very thick and actually doesnt pour all that well. Just be careful not to damage the mold. Once youve got a bit of the resin inside the mold, use your fingers to squish it about inside. Youre goal is to get a layer of the resin along the inner wall of the mold. Give special attention to some of the tiny crevices inside the mold, such as the nose, ears, etc.
Now that the inside wall is coated, start putting
in the rest of the resin. Youre goal here is to fill the mold with
resin, ensuring that no air bubbles are inside. Because the liquid
resin mixture is so thick, its helpful to squeeze out the air in the mold,
pour some resin, let go of the mold so that the resin gets sucked inside
by the vacuum. Repeat this process multiple times until the mold
is full of resin and no bubbles remain. Set it aside to dry, leaving
the hole in the mold facing upwards so no resin drips out.
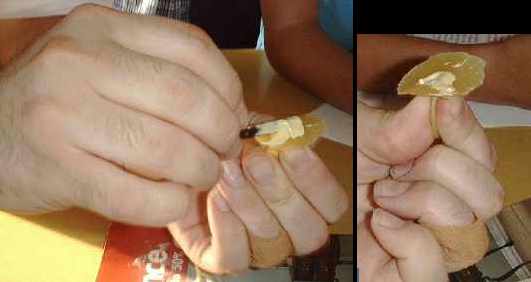
This image is of the resin being pushed into
the mold. Note how I'm squeezing the mold so that when I let it go,
the resin will get sucked inside. Also note the bandage on the finger.
Guess who was careless with his X-acto knife? :-o
Removing the Resin Head from the Latex Mold
Be absolutely sure the resin is dry! The
drying time varies depending on what type and brand you use. One
thing to keep in mind though is that despite what the drying time may say
on the packaging, this process of casting the resins creates thicker layers
of resin than the package may have calculated its times based upon.
A good rule of thumb is to wait until the resin that is exposed (coming
out as a blob on the latex flange) is dry to the touch, then wait twice
as long from then.
So now youre sure the resin is dry. As
before with the original head, peel back the latex mold from the head as
you would a tight glove from your hand.
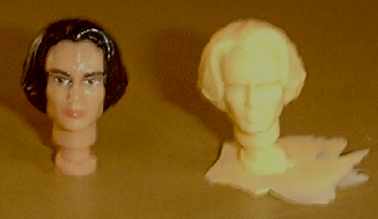
A little blurry, but here's a comparison shot:
the original versus the unpainted copy.
Cleaning Up the New Resin Head
Use an X-Acto knife, Dremel, sandpaper to remove
the resin flange off the base of the new head. If any bubbles crept
in while making the latex mold, it will show up as resin lumps on the head.
These can be carefully removed using a knife or sandpaper. If any
air bubbles got in during the resin pouring process, these can be filled
with any filler putty of your choice and sanded down accordingly.
Additional Comments
This technique tells specifically how to make
molds of heads. Ive also had success making molds and casts of other
action figure parts. The trick is to find out where to glue it down
to the cardboard that allows a secure enough hold, will allow the flanging
of the latex rubber, and not distort the mold of the original part.
This works well for parts that have stems, such as the action figure heads,
but others can be difficult to work with. Keep experimenting to see
what works.
Have fun!
Meanwhile, I found this site that quite a bit of materials and advise on moldmaking. I've never used them or their products before, but they come highly recommended by some Playtrekkers.
Let Playtrek know what you think!